
Day 13 - Bokeh
You may not be familiar with the term, but I bet you've seen it in an image. What exactly is bokeh? According to the dictionary, bokeh is "a Japanese term for the subjective aesthetic quality of out-of-focus ares of a photographic image."
The bokeh effect is achieved by using a shallow depth of field. Remember when we talked about getting a blurry background? That is bokeh! When lights or reflections are in the background, the effect produces strong light blurs on out of focus light, which adds some very unique qualities to the photo, such as sparkly, geometric shapes.
Below, the bokeh effect resulted in hexagonal light shapes in the blurred background.
 The best way to achieve that bokeh effect with your phone is to get very close to your subject and let the background be as far away as possible from the subject. Of course, this isn't very practical to do with photos of people, but it is fairly easy with inanimate objects such as flowers, insects or leaves. Try including some lights in the background to see if you can achieve the sparkly effect, that you see below.

 Ron's phone, a Galaxy 7Edge actually has a "pro" mode that allows you to adjust the ISO and Aperture a bit, an option that is not available on my iPhone 6.
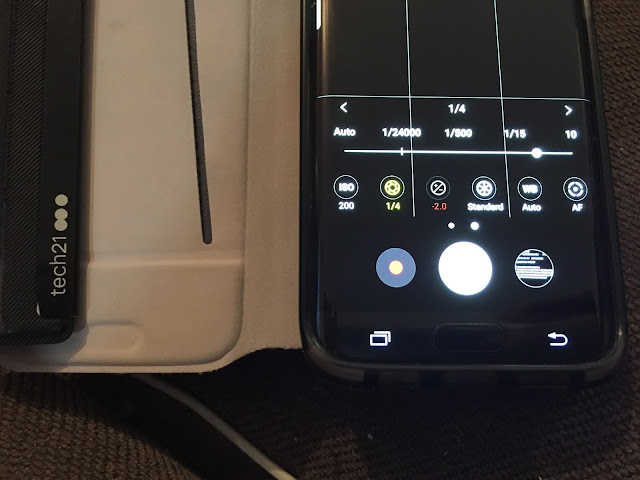
 Opening the aperture wider (lower number) lets more light in and increases the depth of field. In the picture below, you can see that I slid the aperture (that is the icon that is 2nd from the left) to the right to 1/4 to create a shallower depth of field, meaning the things closest to the camera will be in focus.
If opening the aperture wider makes the scene too light, lower the ISO as well to achieve proper exposure.
Below is an unedited photo I took with my iPhone. I positioned the phone so that there was something in the foreground that I could get close to, and candles in the background. Locking focus on the duck allowed the background to achieve some bokeh by blurring it slightly.
 Here is the same scene with Ron's Galaxy 7Edge for comparison purposes. I utilized the Pro mode and set the aperture to 1/4 and then lowered the ISO to avoid it being too bright.

You may not be familiar with the term, but I bet you've seen it in an image. What exactly is bokeh? According to the dictionary, bokeh is "a Japanese term for the subjective aesthetic quality of out-of-focus ares of a photographic image."
The bokeh effect is achieved by using a shallow depth of field. Remember when we talked about getting a blurry background? That is bokeh! When lights or reflections are in the background, the effect produces strong light blurs on out of focus light, which adds some very unique qualities to the photo, such as sparkly, geometric shapes.
Below, the bokeh effect resulted in hexagonal light shapes in the blurred background.


If opening the aperture wider makes the scene too light, lower the ISO as well to achieve proper exposure.

Below is an unedited photo I took with my iPhone. I positioned the phone so that there was something in the foreground that I could get close to, and candles in the background. Locking focus on the duck allowed the background to achieve some bokeh by blurring it slightly.


I can hardly tell the difference in this case, but I do like the control you can have using his camera. I also know that I REALLY need to dust the mantel!!! I can't wait to practice today and to see your photos as well.


Be First to Post Comment !
Post a Comment